 Since posting some "water drop" macro photos in the Samples Gallery, I've had a few of our members ask how it was done.
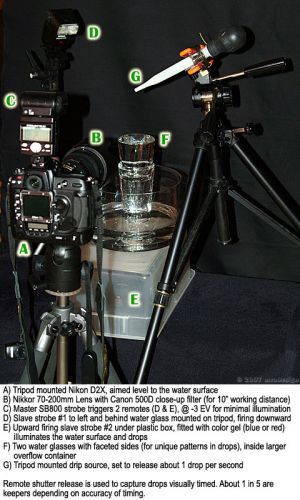
So, here's the setup (click on the photo to view at full size). The shots were taken with a 70-200mm lens on a Nikon D2x. A Canon 500D close-up filter on the lens allowed me to work at a "safe" distance (about 10 inches) while still getting in close.
Three strobes were used to light the water surface and freeze the droplets ... one on camera (master), one at top left to highlight the drops, and one below the water glass equipped with gels to add the color.
The tricky part was timing each shot to capture droplets just as they hit the water surface. I improvised with a tripod-mounted turkey baster to get a slow stream of drops (about 1 per second) and triggered the shutter with a remote release. Even with careful timing only about 1 in 5 shots captured the drops.
Visit my Water Drop gallery to see some of the water drop macros.
If you'd like to learn more about the technique, feel free to post your questions or comments in our forum.


on September 27, 2008, 12:49 pm
You have a fabulous set of photographs on your website gallery. The color gels really make the
Photographs eye catching. I've seen some of this technique done by other photographers with different patterned backgrounds reflected in the drops and splashes...also an awesome effect.Thanks for sharing the tutorial.
Reply to this comment